 #OnTapToday, using @StreamSets to migrate data from your source database to Snowflake. In this post, I will walk through the process of configuring StreamSets to migrate data from my on prem DB to Snowflake.
WHY
You need to get some data from a source database to the Snowflake data warehouse. There were a few options at my disposal. I could have:
- done a simple export of the data to csv and used snowSQL to load the data to a stage and ingested the data that way
- take a look at two of my previous posts, Deploy node-oracledb with Official Instant Client Image and Connect to Snowflake with Node.js Driver to figure out some cool programmatic way to get this data over or
- look at something different such as StreamSets
StreamSets operates on a Hybrid Open–Source Model (HOSS). StreamSets Data Collector is open source, released under the Apache 2.0 license. The remainder of the platform source code is proprietary and not available to customers
In this case, I chose StreamSets.
SETUP
The setup was actually quite complex on my Macbook as there were some hacks necessary on the OS to allow adjustments to the java heap size. Rumor has it, this is just an issue with Mac OS, and other linux OSes are fine. Fortunately, all this can be found with some google searches.
Here are the installation instructions:
- Download, install, and run Data CollectorRemember on a Mac there are some additional OS configurations necessary to get around the heap size issue. I’ll try to locate the link that helped me out and update the post.
- Once you have the Data Collector installed properly, you need to launch it with the following command:
-
bin/streamsets dc

-
- Once you have the Data Collector installed properly, you need to launch it with the following command:
- Launch the Data Collector, via the URL presented after the service starts and click on the Package Manager icon.


- In the search box, enter “Snowflake”, select Snowflake Enterprise Library 1.1.0 from the list, click Install icon and accept Terms of Service*. Once the installation completes, follow instructions to restart Data Collector.

- After the Data Collector restarts, we can create the data migration pipeline.


Since this a simple multi-table migration, we can build this pipeline by connecting a single Origin and Destinations. In this case, we will use the JDBC Multitable Consumer origin and the Snowflake Replicate destination.
- From the Data Collector GUI, select Origin in the upper right corner and enter JDBC in the search box. Double click the JDBC Multitable Consumer icon to place it in the workspace. In this example, to make things simpler, I will be connecting to an already existing Oracle database running in my basement.

- Next select Destinations from the same dropdown in the upper right and search for Snowflake. Again double click the Snowflake icon to place it on the workspace.

- Finally connect the JDBC Origin and the Snowflake Destination by clicking and dragging a connector between the two.

As you can see, there are a number of tab associated with the two phases of this migration pipeline. Complete these with the appropriate values.
JDBC Multitable Consumer:
JDBC
JDBC Connection String: jdbc:oracle:thin:user/password@10.1.1.45:1521/snowflake_pdb

Use Credentials:

Queries Per Second: 10

Number of Threads: 1

Per Batch Strategy: Switch Tables

Max Batch Size (Records): 1000

Batches from Result Set: -1

Result Set Cache Size: -1

Max Clob Size (Characters): 1000

Max Blob Size (Bytes): 1000

Number of Retries on SQL Error: 0

Data Time Zone: +00:00 UTC (UTC)

No-more-data Event Generation Delay (seconds): 0

Quote Character: NONE

Convert Timestamp To String:

Fetch Size: 1000

Additional JDBC Configuration Properties
Tables:
Schema: SNOWFLAKE

Table Name Pattern: DB_%


Table Exclusion Pattern

Schema Exclusion Pattern

Override Offset
Columns
Initial Offset

Enable Non-Incremental Load

Multithreaded Partition
Processing Mode: Off

Offset Column Conditions
Leave all other tabs with any defaults
Snowflake
Snowflake Connections Info
Snowflake Region: AWS - US West (default)

Account: •••••••••

User: •••••••

Password: •••••••••

Connection Pool Size: 1
Snowflake
Warehouse: DB_TESTWH

Database: STREAMSETS_DEMO

Schema: SSDEMO

Table: ${record:attribute('jdbc.tables')}

Use Snowpipe

Upper Case
Schema & Field Names: X

Data Drift Enabled: X

Table Auto Create: X

Create New Columns as VARCHAR: X
Staging
Stage Location: Snowflake Internal Stages

Stage Database: STREAMSETS_DEMO

Stage Schema: SSDEMO

Snowflake Stage Name: ssdemo_stage

Purge Stage File After Ingesting: X

Local File Prefix: sdc

Compressed File: X
Leave all other tabs with any defaults
Now let’s switch over and set up the Snowflake data warehouse. If you do not have an account, you can visit this link to start a free trial. Once you have successfully logged in, simply copy and paste this following set of into the worksheet.
use role sysadmin; --  a role to create the necessary database object


create or replace database streamsets_demo; -- Create a database for the StreamSets Demo

use database streamsets_demo;


create or replace schema ssdemo; -- Create a schema for the StreamSets Demo

use schema ssdemo;


use warehouse DB_TESTWH; -- Use a warehouse. In this case an XS


create or replace stage ssdemo_stage; -- Create an internal stage to land the data from Oracle prior to loading the tables


-- STOP HERE. The following lines of code will be run after the migration.

-- Get row counts from tables

select 'DB_COUNTRY', count(*) from DB_COUNTRY union
select 'DB_DEPARTMENTS', count(*) from DB_DEPARTMENTS union
select 'DB_EMPLOYEES', count(*) from DB_EMPLOYEES union
select 'DB_JOBS', count(*) from DB_JOBS union
select 'DB_JOB_HISTORY', count(*) from DB_JOB_HISTORY union
select 'DB_REGIONS', count(*) from DB_REGIONS;


-- This demo is based in part on the Oracle HR schema.

DROP TABLE COUNTRY;

DROP TABLE DB_COUNTRY;

DROP TABLE DB_DEPARTMENTS;

DROP TABLE DB_EMPLOYEES;

DROP TABLE DB_JOBS;

DROP TABLE DB_JOB_HISTORY;

DROP TABLE DB_REGIONS;
We are now ready to run the StreamSets job. You will notice that we did not create any tables in the Snowflake data warehouse. One of the options we select in the StreamSets configuration was to automatically create the tables we are migrating.
Migrate
Back on the StreamSets Data Collector interface, click Start in the upper right.

The process will begin migrating the data from the source database, in this case, Oracle to Snowflake

I happen to know that there are 193 records across the tables that match the criteria (Table names start with DB_). Can you find where we did that??

After a few seconds, the tables have be created and the data has been migrated. Let’s check it out.
Two of my friends are taking phentermine, and they describe their results as great, like 5 pounds in a week, so I decided to also try it. Can you tell me if https://www.philipsanimalgarden.com/phentermine-online/ has any special offers right now for buying this drug? I would love to buy just one pack but I am not sure what the delivery costs.
A review of the History tab in Snowflake shows the process StreamSets executes to:
- Create the required file format
- Create the table
- Use the put command to load the data into the internal stage
- Executes the copy command to populate the target table


In the Snowflake worksheet execute the following:
select 'DB_COUNTRY', count(*) from DB_COUNTRY union

select 'DB_DEPARTMENTS', count(*) from DB_DEPARTMENTS union

select 'DB_EMPLOYEES', count(*) from DB_EMPLOYEES union

select 'DB_JOBS', count(*) from DB_JOBS union

select 'DB_JOB_HISTORY', count(*) from DB_JOB_HISTORY union

select 'DB_REGIONS', count(*) from DB_REGIONS;
This should give you row counts for each table that was migrated.

Here is the same statement run from SQL Developer. All counts match, so the migration was successful.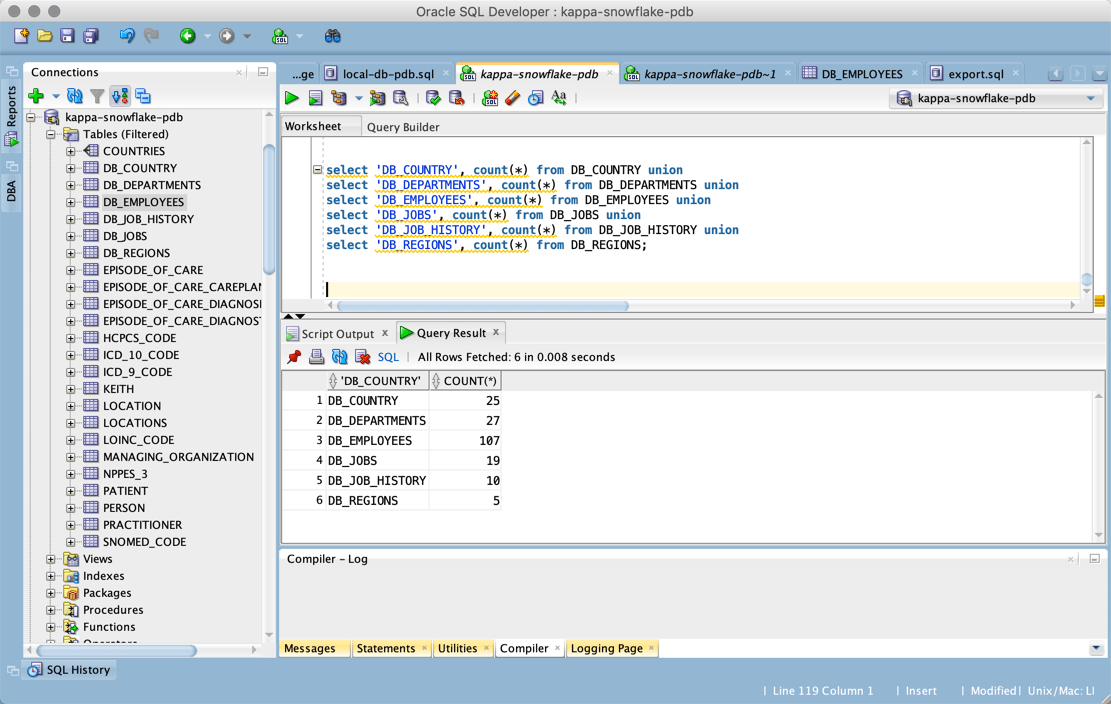
This was a very simple example of using a StreamSets to migrate multiple tables from a source database to Snowflake.
Enjoy!