It’s been a while, but this 20 minutes turned 8 hour project was a lot of fun. It just kept getting better and better. Today boy and girls, I’m gonna take you through my process of migrating a MSSQL database to Oracle. Let get stated.
So, before we had Oracle EBS 11i (2008), there was MARS-G for handling the financials. Fast forward to 2013. The MARS-G data has been archived in a MSSQL 2003 database and now, someone has requested some report. My goal is to make access to this data as easy as possible, so I self to myself, “Self, if you can get this sh-tuff into one of the Oracle databases, you could use Discoverer. That would do the trick!” Soooooo the next day, I got to work.
What did I need:
- SQLDev – CHECK. Version 4 to be exact.
- Admin access to the MSSQL database – CHECK
- Local Database – CHECK. Oracle EX 11g
- Enterprise Database – CHECK. Well at least enough access to create a table. I DO NOT HAVE ACCESS TO PRODUCTION.
PHASE I: Setup SQLDev for the database migration
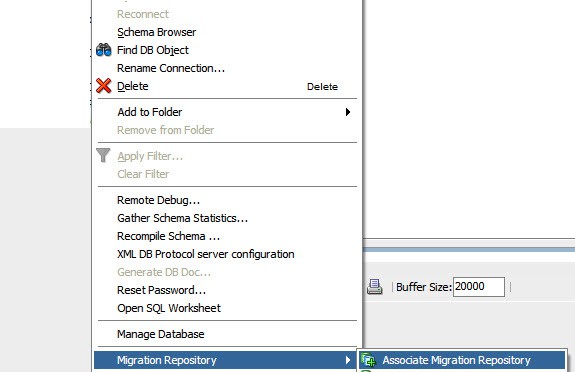
The following screenshots show my process.
In the step below, choose your final destination database, it will save a ton of time
PHASE II: Perform the migration (to local db)
Basically, what I did here was to select my local Oracle EX 11g database as the destination. In the end, this was a mistake on a couple of levels. Running it on my laptop did nothing for performance. What I found out later was that the due to some enhancements in the 11g database, there were some compatibility issues between it and my ultimate destination 10.2.0.4 database. This resulted in me having to do phases 3 and 4. Lets continue. The setup for Phase I resulted in my MSSQL database being migrated to my laptop. This process, if you follow me on twitter @dbcapoeira, you will know took about 2.5 hours to migrate 5.6 million rows of data. It also brought across 3 indexes. The one problem I had here was that you need to make sure if you are migrating from and MSSQL database that the account used to connect the that database has db_owner Permissions or the process will error out.
A review of the log file (it will be the XML file in the root of the folder you choose) will reveal this. Not to mention, the migration will seem to have happened extremely fast. After all that was taken care of, the migration when very smooth. If all goes well with your migration, you will see this:
Once again, you can skip this phase altogether and migrate directly to your destination database.
PHASE III: Build tables in Enterprise Database
The next thing I had to do was build these tables in the 10g database, which was my original goal. My first attempt was to use the Cart feature of SQLDev, export the DDL and run it through SQLDev to create the Objects I needed in my 10g database. No luck!!! Not being a DBA, this is where I discovered that some new features in this part of the table definition were incompatible with 10g. Had to strip that out.
“PCTFREE 10 PCTUSED 40 INITRANS 1 MAXTRANS 255 NOCOMPRESS LOGGING STORAGE(INITIAL 131072 NEXT 131072 MINEXTENTS 1 MAXEXTENTS 2147483645 PCTINCREASE 0 FREELISTS 1 FREELIST GROUPS 1 BUFFER_POOL DEFAULT)”
Had to strip that out. Also needed to make sure that I was using the correct TABLESPACE and creating these objects in the correct custom objects schema, so there was a good bit of editing the export file before I could use it. All in all, I was successful, and all my objects appeared exactly where I thought they would. Long convoluted process (my fault), but so far so good. Now how do I get those tables populated?
PHASE IV: Populate the tables
My next problem was getting the data from laptop database to the Enterprise database. What were my choices. DBLink? Nope, don’t have privileges to create the DBLink. How about SQLDev Database Copy? That just might do it. I go in to SQLDev and click the Database Copy tool:
Now that I have the data in the same “vendor” database type … Oracle, I can copy the data over.
Since I knew I was only copying table data over, this was sufficient
Picked the tables that I needed.
There were a few hiccups here. The table names needed to be the same, so I have to rename the tables to match in both databases and custom objects are in their own schema to which I didn’t have the password, requiring to perform the database copy into my personal schema. Interestingly enough, I have the privileges to create object in the custom schema. This meant that once the data was copied to the tables in my schema, I have to create them again in the custom objects schema and simple do the following:
INSERT INTO custom_schema.table_name VALUES
SELECT * from table_name
I’m sure there is a better way to do this.
PHASE V: Discoverer
Get your Discoverer Admin to register the tables into a new or existing Business Area. Now you can let your end users report on this until their heart is content.
Finally, my take aways:
- Its okay to test that you can do this process, but go ahead and get it into your real dev environment early on.
- Make sure that you have the necessary access to the database. Not being able to log into the custom objects schema added a number of extra steps.
- Have a separate machine run the migration on. If you use your primary work machine, it could be out of commission for an indefinite amount of time.


1 Comment